End-to-end Encryption
If your question is not addressed below, contact us through our support form and we will get back to you shortly.
Yes, Remote Desktop sessions operate over end-to-end encrypted RDP channels with TLS and 256-bit AES encrypted connections. The encryption prevents anyone from viewing your session by listening on the network.
Every session is based on private / public key exchange from the remote to the local computer. The technology is based on the same standards as TLS / SSL and meets today’s standards for security. The key exchange further guarantees viewer-to-host data protection. This means that even Remote Desktop routing servers cannot read the data stream.
All program files are secured using DigiCert code-signing technology allowing for origin verification of the executable.
No, Remote Desktop will not expose or change any local firewall settings so, your local environment is safe during the remote access sessions.
Trusted devices provide an additional layer of security for your Remote Desktop account. Whenever you sign in to your account from a new device, you are required to authorize and add it as a Trusted Device. Enabling the trusted device feature lets you prevent unauthorized access to your remote desktop account.
When you sign in to your Remote Desktop account from a new device for the first time, you will be prompted to add your device to the trusted devices list.
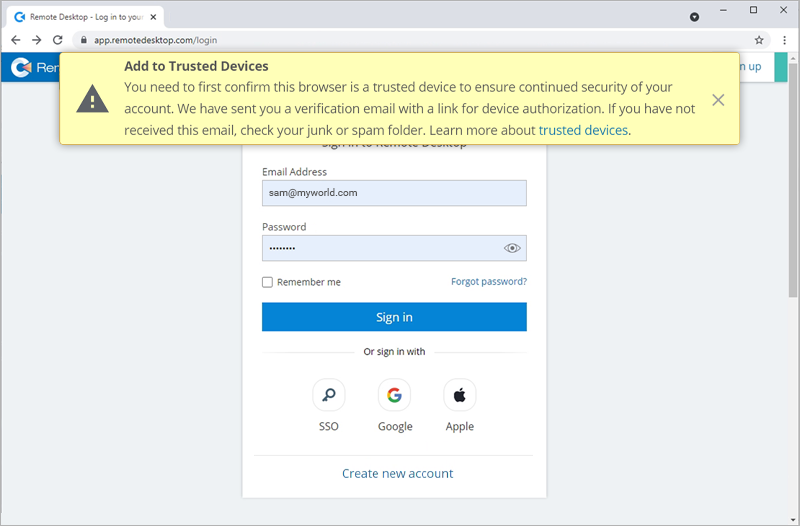
You will receive an email at your registered email address for device authorization. To ensure your account security, click the 'Add to trusted devices' button in this email to add your device to the trusted devices list.
This is only for first-time sign-in from a device after enabling the feature. Subsequent sign-ins will be as usual. To view the list of your trusted devices, navigate to 'My Account' > 'Security' > 'List of trusted devices'.
Yes, you can remove a device from the trusted devices for your Remote Desktop account.
To remove a device from a trusted devices list,
- Sign in to Remote Desktop via any browser.
- Go to the 'Security' tab. In the 'Trusted Devices' section, you can view the list of all your linked devices.
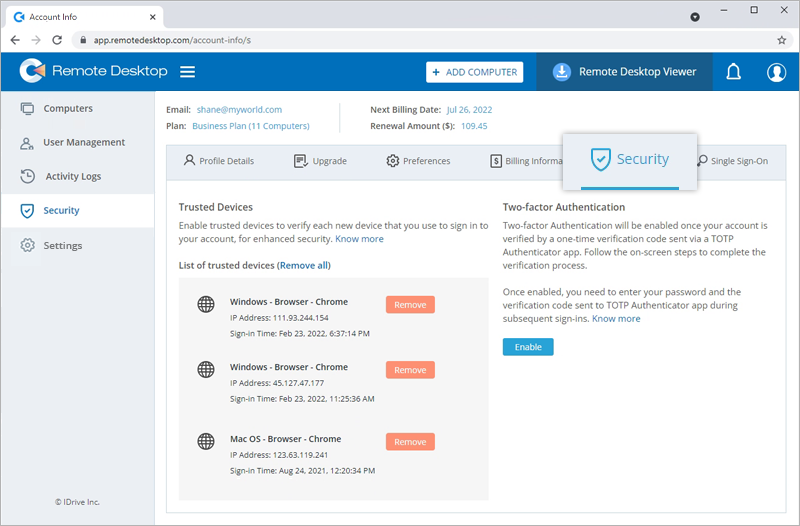
- Click 'Remove' against a device name to remove the same from the list of trusted devices.
Click 'Remove all' to remove all the devices from the list.
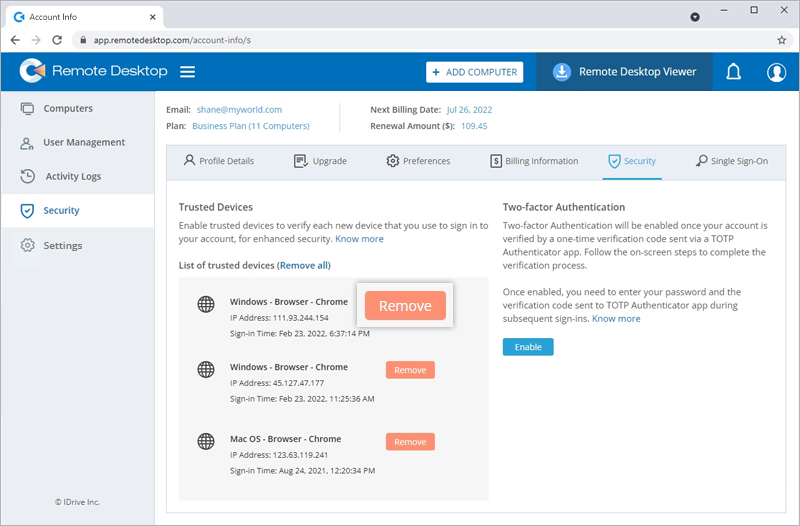
The two-factor authentication feature enhances the security of your Remote Desktop account and prevents unauthorized access. Once two-factor authentication is enabled, in addition to your password you will need to enter a verification code received on your Time-based OTP authenticator app while signing in to your Remote Desktop account.
Remote Desktop supports the following TOTP authentication applications:
- Google Authenticator (Android / iPhone)
- Duo Mobile (Android / iPhone)
- Microsoft Authenticator (Window Phone 7)
- Any other authentication app that supports time-based one-time protocol or is compatible with Google Authenticator
To set up two-factor authentication with Time-based OTP authentication,
- Sign in to Remote Desktop via any browser.
- Navigate to 'My Account' > 'Security' > 'Two-factor authentication'.
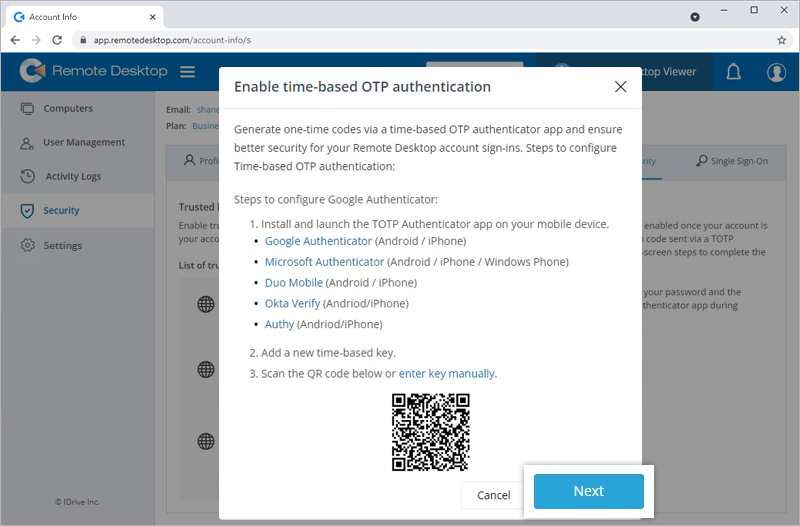
- Click 'Enable'. The 'Enable Time-based OTP Authentication' window appears with a QR code and an option to 'enter key manually'.
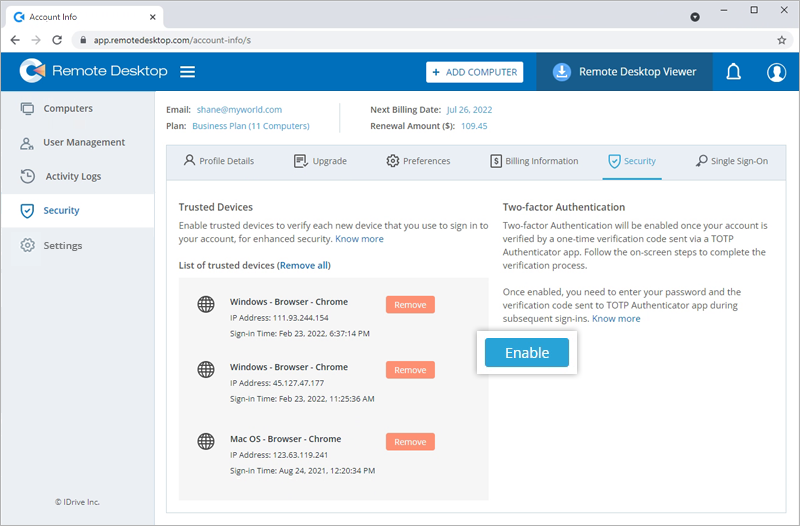
- Install and launch any Time-based OTP authenticator app on your mobile device and scan the QR code displayed on your computer screen.
Alternatively, you can also view the key by clicking 'enter key manually' and type it manually on your mobile device.
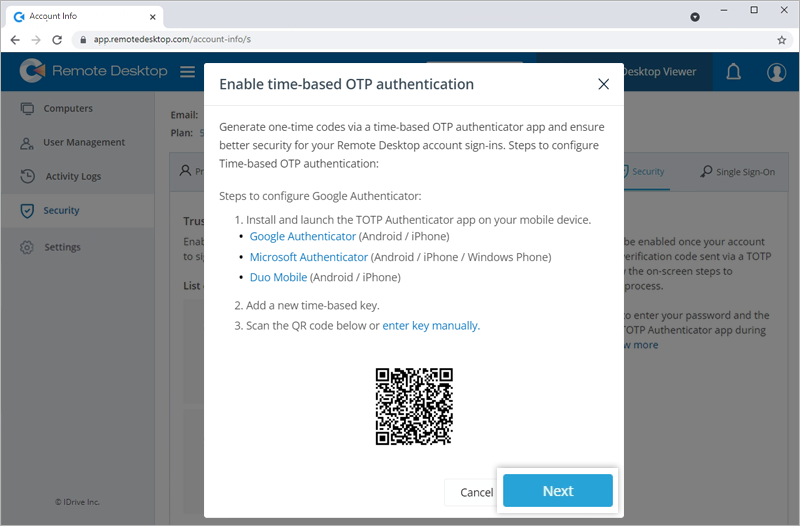
- Click 'Next'.
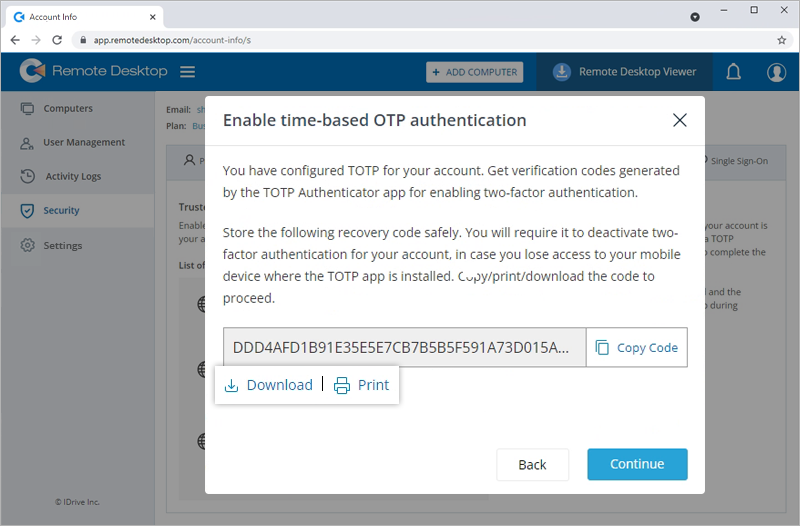
- Copy the recovery code displayed on your computer screen. Click 'Download' to download the code as a .txt file, or click 'Print' to print the same.
Note: You will require the recovery code to disable two-factor authentication for your account, in case you lose access to your mobile device where the Time-based OTP authenticator app is installed.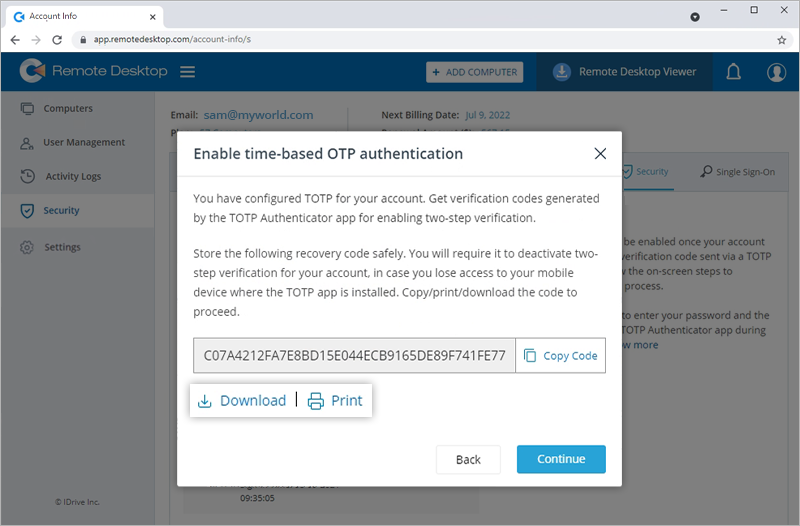
- Click 'Continue'.
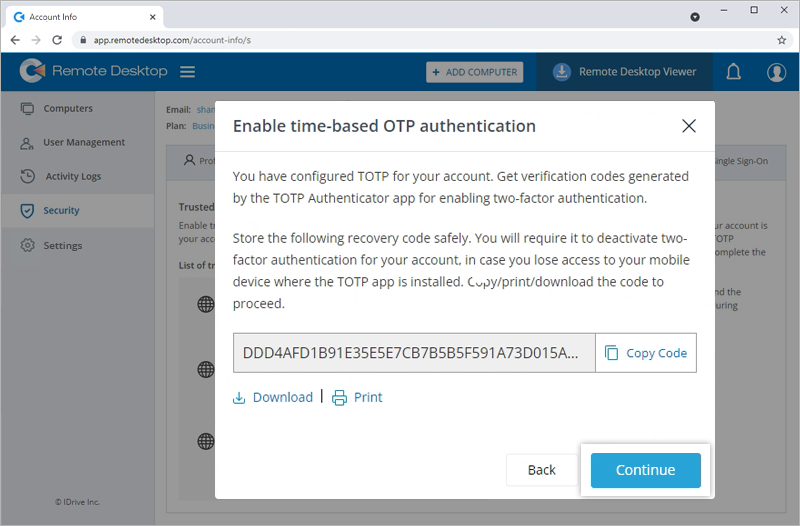
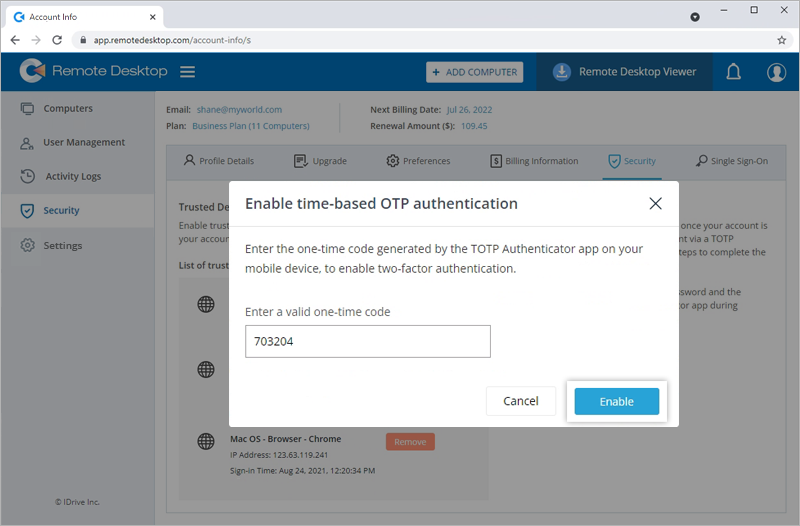
- Enter the one-time code generated by the TOTP app in your mobile device and click 'Enable'. Two-factor authentication via Time-based OTP authentication will be enabled for your Remote Desktop account.
Note: Users can also enable two-factor authentication and secure their accounts.
You can sign in to your account using a one-time code generated by the Time-based OTP authenticator app.
To sign in after two-factor authentication is enabled,
- On the sign-in screen, enter your username and password and click 'Sign In'.
- You will be prompted to enter the one-time code generated by the Time-based OTP Authenticator app on your mobile device.
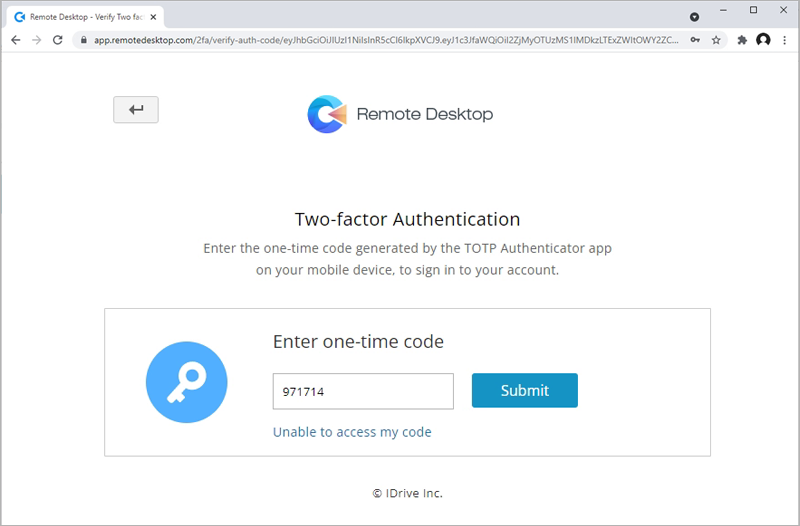
- Enter the code and click 'Submit'. You will be signed in to your remote desktop account.
A recovery code is generated while enabling two-factor authentication for your remote desktop account via the Time-based OTP authenticator app. You will require this recovery code to disable two-factor authentication for your account, if you lose access to your mobile device. It is therefore essential to save this code.
To save the recovery code,
- Sign in to Remote Desktop via any browser.
- Navigate to 'My Account' > 'Security' > 'Two-factor authentication'.
- Click 'Enable'. The 'Enable Time-based OTP Authentication' window appears with a QR code and an option to 'enter key manually'.

- Install and launch the TOTP app on your mobile device. Scan the code displayed on your computer screen.
- Click 'Next'.
- Copy the recovery code displayed on your computer screen. You can also click 'Download' to download the code as a .txt file or click 'Print' to print the same.
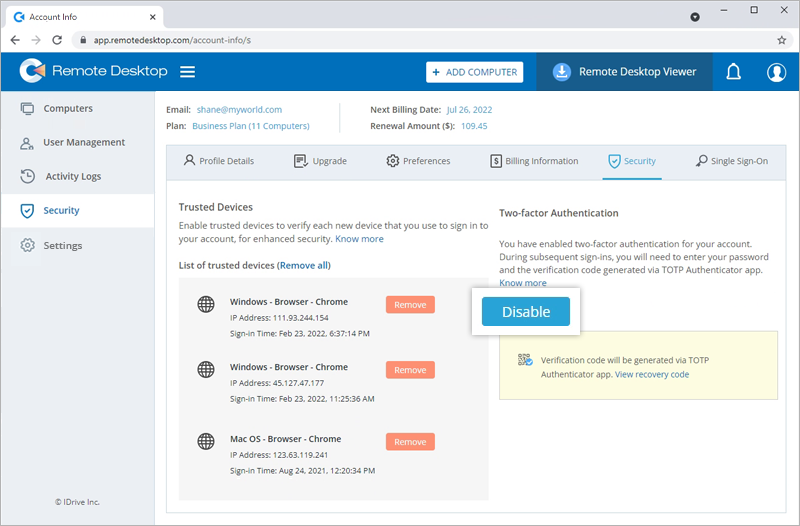
To disable two-factor authentication,
- Sign in to Remote Desktop via any browser.
- Navigate to 'My Account' > 'Security' > 'Two-factor authentication'.
- Click 'Disable'. Two-factor authentication will be disabled for your account.
Can I disable two-factor authentication for my Remote Desktop account with Time-based OTP authentication, in case I lose access to my mobile device?
Yes, you can disable two-factor authentication for your Remote Desktop account with Time-based OTP authentication.
To disable,
- Sign in to Remote Desktop via any browser.
- In the verification code screen that appears, click 'Unable to access my code'.
- In the 'Recovery Code' field, enter the recovery code generated while configuring two-factor authentication for your Remote Desktop account.
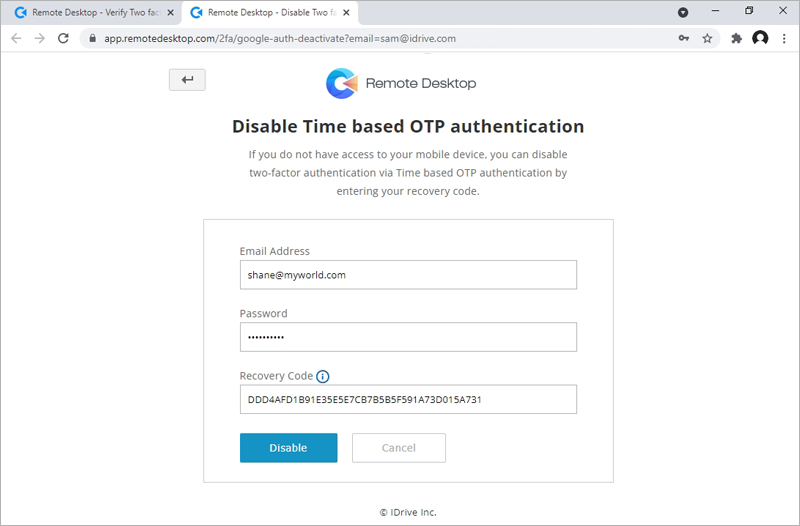
- Click 'Disable'.